
All-in-one mushroom grow bags are self-contained systems designed for easy cultivation of various mushroom species. They simplify the growing process, making it accessible to both beginners and experienced growers;
What Are All-in-One Mushroom Grow Bags?
All-in-one mushroom grow bags are pre-sterilized, self-contained systems designed for cultivating mushrooms. They typically include a built-in filter patch for gas exchange and an injection port for inoculation. These bags are filled with a sterilized substrate, such as grain or compost, and are ready for use with liquid cultures or spore syringes. Their design simplifies the growing process, making it accessible to both beginners and experienced growers. The bags are versatile and can support various mushroom species, including oyster, lion’s mane, and shiitake. They are a convenient option for those looking to grow mushrooms at home without the need for advanced equipment or multiple components.
Advantages of Using All-in-One Mushroom Grow Bags
All-in-one mushroom grow bags offer unmatched convenience and ease of use, making them ideal for both beginners and experienced growers. Their pre-sterilized substrate and built-in filter patch eliminate the need for multiple components, simplifying the growing process. These bags are cost-effective and reduce the risk of contamination, as they are specifically designed for mushroom cultivation. They also save time, as the substrate is ready to use, and their compact design allows for space-efficient growing. Additionally, they are versatile, supporting a wide range of mushroom species, from oyster to lion’s mane, and can be used for both small-scale and larger growing operations with minimal effort.
Who Can Benefit from Using These Bags?
All-in-one mushroom grow bags are perfect for both beginners and experienced growers. Hobbyists and enthusiasts can easily cultivate mushrooms without extensive knowledge or equipment. These bags are ideal for home-based growers, offering a space-efficient solution. Educators and researchers also benefit, as they simplify teaching and experimentation. Commercial growers can use them for small-scale production or testing new species. Their versatility and ease of use make them suitable for anyone interested in mushroom cultivation, regardless of skill level or scale, ensuring a hassle-free and successful growing experience for all users.
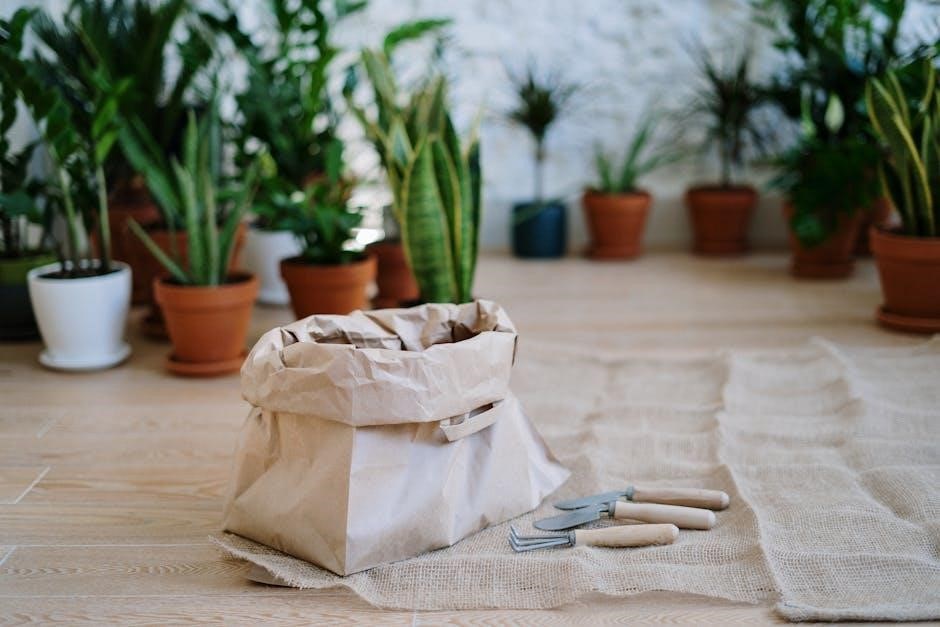
Preparation and Setup
Preparation is crucial for successful mushroom cultivation. Sterilize your environment, set up a clean workspace, and ensure all tools are ready; Use liquid cultures for best results.
Step 1: Sterilize Your Environment
Sterilizing your environment is the first and most critical step in mushroom cultivation. Clean all surfaces with a strong disinfectant, such as bleach or isopropyl alcohol. Ensure your workspace, including gloves and tools, is spotless to prevent contamination. This step lays the foundation for a successful grow, as any bacteria or mold can ruin the entire process. Proper sterilization ensures the mycelium has a clean environment to thrive. Always maintain cleanliness throughout the process to minimize risks and maximize yield. A clean environment is essential for healthy mycelium growth and mushroom development.
Step 2: Choosing the Right Spore or Liquid Culture
Selecting the appropriate genetic material is crucial for successful mushroom cultivation. All-in-one grow bags are designed to work best with clean liquid mushroom cultures rather than spore syringes. Liquid cultures contain mycelium that is already growing, which speeds up colonization. Ensure the culture is fresh and free from contamination to guarantee healthy growth. If using spores, it’s possible but less efficient. Always choose strains compatible with your substrate and desired conditions. For species like oyster or lion’s mane mushrooms, liquid cultures are ideal. This step ensures the mycelium can colonize efficiently, leading to a robust and healthy grow.
Step 3: Setting Up a Clean Workspace
Creating a clean workspace is essential to prevent contamination and ensure successful mushroom cultivation. Start by thoroughly cleaning a hard, non-porous surface, such as a countertop, using bleach or isopropyl alcohol. Put on nitrile gloves to minimize the risk of introducing contaminants. Ensure the area is well-lit and free from drafts, as airborne particles can disrupt the process. A clean workspace not only protects your grow bag from unwanted mold or bacteria but also creates an optimal environment for the mycelium to thrive. This step is critical for maintaining sterility and achieving a healthy, productive grow.
Inoculation Process
The inoculation process involves injecting genetic material into the grow bag using a sterile needle and syringe. This step introduces the mycelium to the substrate, initiating colonization. Proper technique and sterility are crucial to prevent contamination and ensure successful growth. Inject 2-4cc of liquid culture or spores into the bag through the port, moving the needle to distribute evenly. This step is vital for establishing the mycelium and promoting healthy mushroom development.
Understanding Inoculation and Its Importance
Inoculation is the process of introducing genetic material, such as spores or liquid culture, into the grow bag to initiate mycelium growth. This step is critical for colonization, as it ensures the substrate is populated with the desired mushroom species. Proper inoculation prevents contamination and guarantees a healthy start for mushroom development. The process involves using a sterile needle to inject 2-4cc of material into the bag, ensuring even distribution. Maintaining a clean environment and using sterile tools are essential to avoid contamination. Successful inoculation sets the foundation for a thriving grow, making it a pivotal step in the mushroom cultivation process.
How to Attach the Sterile Needle to the Syringe
To attach the sterile needle to the syringe, first ensure both components are sterile. Remove the syringe and needle from their packaging, taking care not to touch the needle tip. Hold the syringe firmly and align the needle with the syringe’s nozzle. Gently twist the needle clockwise until it securely locks into place. Make sure the connection is snug to prevent any leaks during inoculation. Once attached, the syringe is ready for use. Properly securing the needle ensures accurate injection of genetic material into the grow bag, minimizing the risk of contamination or waste; Handle the assembled syringe with care to avoid damaging the needle or introducing contaminants.
Injecting the Genetic Material into the Bag
Once the sterile needle is securely attached to the syringe, locate the injection port on the grow bag. Carefully insert the needle into the port at a slight angle to ensure proper flow. Slowly depress the syringe plunger to inject 2-4cc of genetic material into the bag, moving the needle slightly as you inject to distribute the material evenly. Avoid over-injecting, as this can create excess moisture. After injection, withdraw the needle at the same angle it was inserted to prevent spills; Ensure the port is sealed tightly to maintain sterility. Proper injection technique minimizes contamination risk and promotes healthy mycelium growth. Always follow the recommended dosage for optimal results.
Tips for Successful Inoculation
Ensure your workspace is clean and well-lit to maintain sterility. Always wear nitrile gloves and use alcohol to sanitize surfaces and tools. Avoid touching the sterile needle or syringe tip to prevent contamination. Inject genetic material slowly and evenly, moving the needle slightly to distribute the material effectively. Use 2-4cc of liquid culture or spore solution per injection site to avoid over-saturating the substrate. After inoculation, seal the injection port tightly to maintain a sterile environment. Monitor the bag for signs of contamination, such as mold or discoloration. Store the bag in a clean, dark place at room temperature to promote healthy colonization. Proper technique and attention to detail are key to successful inoculation and a bountiful harvest.
Colonization Phase
During the colonization phase, the bag should be kept in ambient light, away from direct sunlight. Maintain consistent humidity, vent the bag once daily, and avoid contamination for successful mycelium growth.
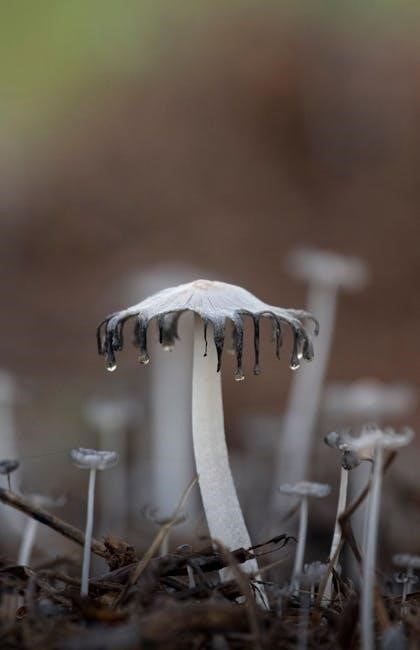
What Happens During Colonization?
During colonization, the mycelium spreads throughout the substrate within the grow bag. This process involves the mycelium breaking down organic matter and establishing a robust network for mushroom growth. It typically takes 4-8 weeks, depending on the species and conditions. The bag must be kept in ambient light, away from direct sunlight, to promote healthy colonization. Proper humidity and ventilation are crucial to prevent contamination and ensure the mycelium thrives. Once fully colonized, white, fluffy growth will be visible throughout the substrate, signaling readiness for the fruiting phase.
Optimal Environment for Colonization
The ideal environment for colonization requires consistent temperatures between 70-75°F (21-24°C) and high humidity. Place the bag in ambient light, avoiding direct sunlight. Maintain cleanliness and ensure limited airflow to prevent contamination. Keep the substrate moist but not waterlogged. Avoid disturbing the bag during this phase. Proper conditions promote healthy mycelium growth, ensuring robust colonization before fruiting begins.
How Long Does Colonization Take?
Colonization typically takes 1-4 weeks, depending on the mushroom species and environmental conditions. Oyster mushrooms may colonize faster, within 1-2 weeks, while others like lion’s mane may require up to 4 weeks. Maintain consistent temperatures (70-75°F) and humidity during this phase. Avoid disturbing the bag, as mycelium needs undisturbed time to grow. Growth can be observed through the bag’s transparent material. Once fully colonized, the substrate will appear dense with white mycelium, signaling readiness for the fruiting phase. Patience is key, as rushing this step can lead to contamination or poor yields.
Monitoring the Colonization Process
Regularly monitor the colonization process to ensure healthy mycelium growth. Check the bag daily for visible signs of colonization, such as a white, cotton-like growth spreading across the substrate. Maintain humidity by misting the inside walls when water droplets evaporate. Keep the bag in ambient light, avoiding direct sunlight. Ensure the environment remains clean to prevent contamination. Colonization typically takes 1-4 weeks, depending on the species. Avoid opening the bag excessively, as this can introduce contaminants. If mold or pests appear, address the issue promptly; Proper monitoring ensures a healthy mycelium network, setting the stage for successful mushroom growth.
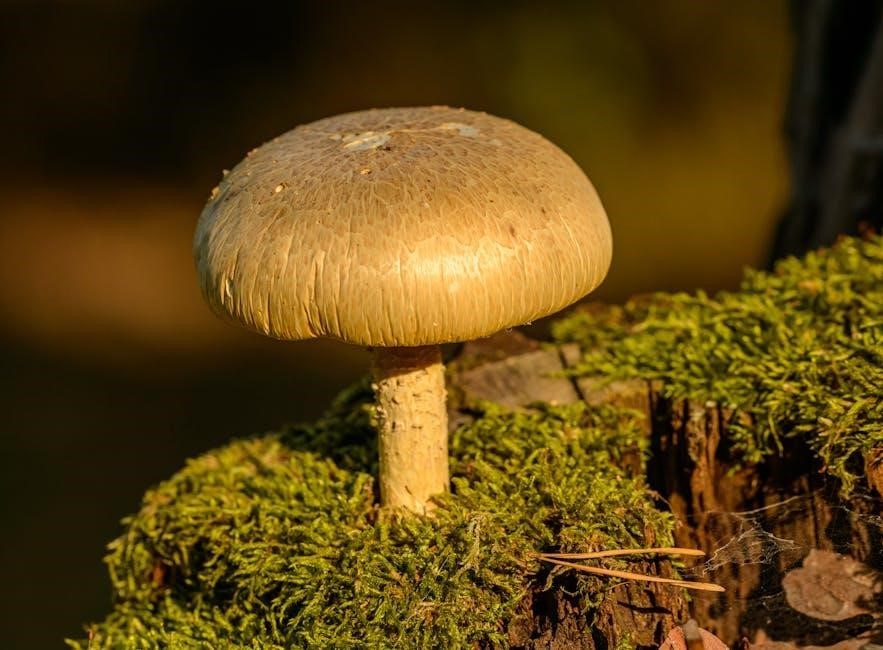
Fruiting Phase
The fruiting phase begins once colonization is complete. Place the bag in indirect light, maintaining humidity by misting the walls daily. Ensure proper ventilation to promote healthy mushroom growth and monitor for pins, which signal the start of fruiting. Consistent conditions encourage robust yields.
Preparing the Bag for Fruiting
Once colonization is complete, prepare the bag for fruiting by ensuring proper conditions. Move the bag to a location with indirect light, such as a room with a fluorescent bulb, to promote healthy growth. Mist the inner walls of the bag daily to maintain humidity, but avoid over-saturating the substrate. Ensure adequate ventilation by opening the bag slightly or creating small holes to allow air exchange. For species like oyster mushrooms, cut 1-2 inch slits in the bag to create fruiting sites. Maintain consistent temperatures between 70-75°F to encourage robust fruiting. Regular monitoring and adjustments will help optimize the environment for mushroom growth.
Creating the Right Conditions for Mushroom Growth
Creating the right conditions for mushroom growth involves maintaining optimal humidity, light, and temperature. Mist the inner walls of the bag daily to maintain humidity, ensuring the substrate remains moist but not waterlogged; Provide indirect light, such as from a fluorescent bulb, for 8-14 hours daily to promote healthy growth. Keep the temperature consistent, typically between 70-75°F, depending on the species. Ensure proper ventilation by slightly opening the bag or creating small holes to allow air exchange, which prevents CO2 buildup. Avoid direct sunlight and drafts, as they can disrupt the environment. Regular monitoring of these conditions will help foster a thriving mushroom crop.
How to Properly Mist and Ventilate the Bag
Proper misting and ventilation are crucial for maintaining the ideal environment within the grow bag. Use a clean spray bottle to mist the inner walls daily, ensuring consistent humidity without oversaturating the substrate. Avoid spraying directly on the mycelium or substrate to prevent contamination. For ventilation, slightly open the bag or create small holes to allow air exchange, ensuring CO2 levels remain balanced. This step is essential for promoting healthy mycelium growth and preventing stagnation. Regular monitoring of humidity and airflow will help maintain an optimal environment for mushroom development, ensuring a successful and healthy harvest.
When to Expect Mushroom Pins
Mushroom pins typically begin to appear 1-2 weeks after the colonization phase, depending on the species and environmental conditions. Oyster mushrooms, for example, may start pinning within 7-10 days, while other varieties like lion’s mane may take longer. Pins are small, delicate formations that indicate the start of fruiting. Ensure the bag is in ambient light, as direct sunlight can inhibit growth. Maintain consistent humidity and temperature, and monitor for pins daily. Once pins are visible, they will quickly develop into mature mushrooms within a few days. Proper misting and ventilation during this phase are essential for healthy growth and abundant yield.
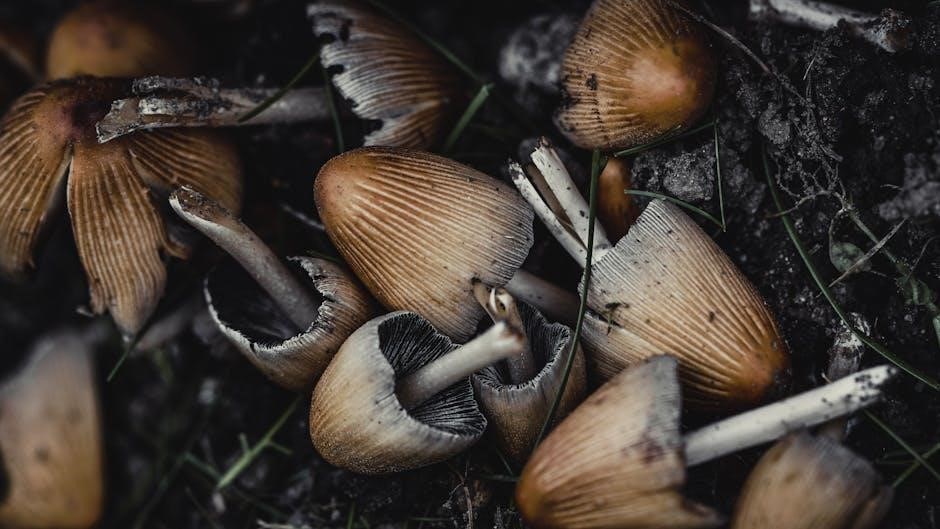
Harvesting Mushrooms
Mushrooms are ready to harvest when the caps fully open and begin to separate from the stem. Use clean hands or a knife to gently twist or cut them, ensuring minimal damage to the mycelium. Harvest promptly to encourage a second flush and avoid over-maturity, which can reduce flavor and texture. After harvesting, inspect the bag for remaining pins and maintain proper conditions for additional growth cycles.
When Are Mushrooms Ready to Harvest?
Mushrooms are ready to harvest when their caps fully open and begin to separate from the stem. This typically occurs after the pins have developed into mature fruiting bodies. The exact timing varies by species but generally ranges from 1-3 weeks after pinning. Look for consistency in size and color, as over-mature mushrooms may lose flavor and texture. Harvest promptly to avoid contamination and encourage a second flush. Use clean hands or a sterile knife to gently twist or cut the mushrooms at the base, ensuring minimal damage to the mycelium. Proper timing ensures optimal flavor and promotes healthy regrowth.
How to Harvest Mushrooms Correctly
To harvest mushrooms correctly, wear clean gloves to prevent contamination. Gently twist the mushroom at the base to avoid damaging the mycelium. For larger species, use a sterile knife to cut at the stem base. Harvesting in the morning, when dew is present, helps maintain humidity. Avoid pulling or tugging, as this can harm the substrate. Collect mushrooms in a clean container and inspect for any debris. Harvesting at the right time ensures optimal flavor and texture. After harvesting, mist the bag lightly to encourage a second flush. Proper handling promotes healthy regrowth and maintains the integrity of the mycelium.
Post-Harvest Care for the Bag
After harvesting, clean the bag thoroughly with a damp cloth to remove any debris or spores. Reseal the bag to maintain humidity and encourage a second flush. Ensure the bag is kept in a clean, dry environment with consistent temperatures between 55-65°F (13-18°C). Mist the interior lightly daily to maintain moisture but avoid over-saturation, which can lead to mold. Monitor the bag for contamination or mold growth. If contamination is present, discard the substrate immediately. Proper post-harvest care extends the life of the bag and promotes healthy mycelium for future growth. Regular monitoring ensures optimal conditions for potential subsequent harvests.
Additional Tips and Considerations
- Always observe the growth pattern to detect any anomalies early.
- Maintain a clean environment to prevent contamination risks.
- Use filtered water for misting to avoid introducing impurities.
- Ensure proper air exchange without over-exposing the bag.
- Monitor temperature and humidity levels consistently.
Importance of Maintaining Cleanliness
Maintaining cleanliness is crucial when using all-in-one mushroom grow bags to prevent contamination. Sterilize your environment and tools before inoculation to minimize the risk of mold or bacteria growth. Always wear gloves and ensure the workspace is clean. Contamination can ruin the entire process, leading to failed growth or unhealthy mushrooms. Regularly inspect the bag for any signs of impurities and address them promptly. Cleanliness also extends to the handling of spores or liquid cultures, as improper handling can introduce contaminants. By prioritizing hygiene, you create an optimal environment for mycelium to thrive and produce healthy mushrooms. Clean practices ensure a successful and rewarding grow.
Common Mistakes to Avoid
One common mistake is over-inoculation, which can lead to contamination. Avoid injecting more than the recommended 2-4cc of genetic material. Another error is insufficient sterilization of the environment and tools, which increases the risk of mold and bacteria. Neglecting to maintain proper humidity and ventilation can hinder mycelium growth and fruiting. Over-misting or under-misting the bag is also a frequent issue, as it disrupts the delicate moisture balance needed for healthy mushroom development. Additionally, some growers forget to monitor colonization progress, missing signs of contamination or stalled growth. By being mindful of these pitfalls, you can ensure a successful and productive mushroom growing experience with all-in-one bags.
How to Troubleshoot Common Issues
If contamination occurs, immediately isolate the bag to prevent spreading. Check for proper sterilization techniques and ensure all tools are clean. If mycelium growth is slow, verify that the environment is within the optimal temperature range (usually 70-80°F) and maintain consistent humidity. For poor fruiting, inspect light exposure—most species require 8-14 hours of indirect light daily. If mushrooms are not pinning, ensure adequate ventilation and misting schedules. Addressing these issues promptly can salvage the grow and improve yields. Always refer to the specific instructions provided with your kit for tailored solutions, as different species may have unique requirements.
Using the Bag for Multiple Species
All-in-one grow bags are versatile and can support multiple mushroom species, such as oyster or lion’s mane, by adjusting environmental conditions and substrates as needed for optimal growth.
Which Mushroom Species Work Best with All-in-One Bags?
Oyster and lion’s mane mushrooms thrive in all-in-one grow bags due to their adaptability to controlled environments. These species prefer consistent humidity and moderate light, making the bags ideal. Other varieties like shiitake and button mushrooms can also succeed, but oyster mushrooms are the most popular choice for beginners. The bags’ design allows for easy adjustment of conditions, such as light exposure and substrate composition, to suit different species. For manure-loving fungi, like certain oyster strains, the bags are particularly effective. Proper substrate selection and maintenance of optimal conditions ensure healthy growth for a wide range of mushroom species.
Adjusting Conditions for Different Species
Different mushroom species require tailored conditions for optimal growth. Oyster mushrooms thrive in bright, indirect light, while lion’s mane prefers slightly lower humidity. Temperature adjustments are crucial; oyster mushrooms grow best at 55-65°F, whereas shiitake may need cooler temperatures. Humidity levels should be monitored and adjusted based on the species’ needs. For manure-loving fungi, ensure the substrate remains moist but not waterlogged. Light exposure should be controlled to prevent direct sunlight, which can overheat the bag. By fine-tuning these factors, growers can create an ideal environment for their chosen species, ensuring healthy mycelium growth and abundant fruiting. Proper adjustments enhance yield and prevent contamination, making the process more successful.
Step-by-Step Guide
Start by drawing filtered air into the bag. Attach the sterile needle to the syringe for inoculation. Inject 2-4cc of genetic material, moving the needle around. Squeeze the bag gently to distribute the material evenly. Sanitize the environment thoroughly before and after handling the bag to prevent contamination. Follow the recommended timescales for colonization and fruiting, ensuring proper conditions for optimal growth. Regular monitoring and adjustments will help achieve a successful harvest. Maintain cleanliness and control humidity levels as specified for your mushroom species. Properly ventilate the bag daily to promote healthy mycelium development. Avoid over-handling the bag to minimize the risk of contamination. Keep the bag away from direct sunlight and ensure it is placed in a stable, ambient environment. After colonization, prepare the bag for fruiting by creating the necessary conditions for mushroom pins to form. Mist the bag as needed to maintain humidity and promote growth. Once mushrooms reach maturity, harvest them carefully to avoid damaging the mycelium or the bag. After harvesting, clean and store the bag properly if reusing it for another grow. Always follow the specific instructions provided with your grow bag for the best results.
Step 1: Drawing Filtered Air into the Bag
Drawing filtered air into the bag is a critical first step to ensure proper exchange of gases and maintain a sterile environment; Attach the sterile needle to the syringe containing the genetic material. Before injecting, make sure the bag is sealed tightly to prevent contamination. Insert the needle through the port, and gently squeeze the syringe to draw filtered air into the bag. This step ensures the bag is prepared for inoculation. Once the air is drawn, proceed to inject 2-4cc of genetic material into the bag, moving the needle around to distribute it evenly. After injection, squeeze the bag gently to spread the material uniformly. This process ensures the mycelium colonizes effectively. Always sanitize the environment before handling the bag to minimize contamination risks. Properly sealing the bag after inoculation is essential for maintaining humidity and promoting healthy growth. Regular monitoring of the bag’s conditions will help achieve optimal results. By following these steps, you create a conducive environment for mushroom growth. This initial step sets the foundation for successful colonization and fruiting. Always handle the bag with clean gloves and tools to ensure sterility.
Step 2: Inoculation and Timescales
Inoculation is the process of introducing genetic material into the grow bag. Attach a sterile needle to the syringe and inject 2-4cc of liquid culture or spores through the port. Move the needle around to distribute the material evenly. After inoculation, seal the bag tightly. Colonization typically takes 4-8 weeks, depending on the species and environmental conditions. Maintain a clean, humid environment with indirect light. Avoid disturbing the bag during colonization. Once mycelium is visible, the bag is ready for the fruiting phase. Proper inoculation and patience are key to successful mushroom growth. Ensure all tools are sterilized to prevent contamination.
Step 3: Squeezing the Bag
Squeezing the bag is a crucial step to ensure even colonization and prevent air pockets. Gently compress the bag to distribute the substrate uniformly, ensuring the mycelium grows consistently. After inoculation, squeeze the bag lightly to spread the genetic material evenly. This step helps maintain proper humidity and promotes healthy mycelium growth. Avoid over-squeezing, as it may damage the substrate or disrupt the colonization process. Squeeze the bag once or twice during the colonization phase, depending on the species and substrate density. This ensures optimal conditions for mushroom growth and prevents contamination. Always sanitize your hands before handling the bag.
Step 4: Sanitizing the Environment
Sanitizing the environment is essential to prevent contamination and ensure a successful grow. Begin by cleaning your workspace with a 70% alcohol solution or bleach. Wipe down all tools, surfaces, and your hands thoroughly. Maintain a sterile environment throughout the process to protect the mycelium from competing microorganisms. Use a HEPA air filter if possible to reduce airborne contaminants. Avoid over-sanitizing, as it can damage the substrate or mycelium. Consistent sanitization practices will minimize the risk of mold and bacteria, fostering a healthy growth environment for your mushrooms. Always prioritize cleanliness to achieve optimal results.
Frequently Asked Questions
Do I Need to Cut the Bag When Mushrooms Start to Pin? Yes, cutting the bag above the substrate allows mushrooms to grow freely. Always use clean tools to prevent contamination.
Do I Need to Cut the Bag When Mushrooms Start to Pin?
Cutting the bag when mushrooms start to pin is essential for healthy growth. Use a clean knife or scissors to make small incisions just above the substrate. This allows the mushrooms to emerge without obstruction. Ensure tools are sterilized to prevent contamination. Cutting promotes better airflow and light exposure, encouraging robust fruiting. Avoid cutting too deeply to prevent damaging the mycelium. For species like oyster mushrooms, creating an “X” shape on the bag can enhance yield. Always maintain cleanliness during this process to ensure a successful harvest.
Can I Use Spore Syringes with All-in-One Bags?
While spore syringes can be used with all-in-one bags, it’s crucial to follow proper sterilization and injection techniques. Attach a sterile needle to the syringe and inject 2-4cc of spores into the bag’s port. Move the needle around during injection to distribute spores evenly. Ensure the environment is clean to minimize contamination risks. Although possible, using liquid cultures is often more effective for consistent results. Always sanitize the needle and surrounding area with alcohol before and after inoculation. This method works well for experienced growers but may require more care for beginners to achieve optimal colonization.
How Do I Transfer the Contents to a Monotub?
To transfer the contents of your all-in-one grow bag to a monotub, start by sanitizing your tools and environment. Carefully empty the entire contents of the bag into the monotub, ensuring minimal disturbance to the substrate and mycelium. Lightly mist the inside walls of the monotub with clean water to maintain humidity. Loosely cover the tub with a lid to allow for airflow while preventing contamination. Monitor the environment to ensure optimal conditions for fruiting. This method allows for better control over humidity and light, promoting healthy mushroom growth. Always sanitize your hands and tools before handling the contents to avoid introducing contaminants.